Quantcast
Channel: DIY 3D Printing
Viewing all 2481 articles
Browse latest View live

Wally and 3d printer testing


Low cost simple 3d printer enclosure made from plastic boxes

$
0
0


Cheap, simple and effective 3d printer enclosure made from two plastic boxes by rjacobsson.
He used Ikea boxes, but I think it will work with any plastic container and keep temperature of your print volume constant and elevated from surrounding.
It also reduces the noise and contains the fumes.
Like any enclosure without thermostat it overheat the motors but you should experiment until you discover what works best for you.


Build guide on Instructables:

http://www.instructables.com/id/Enclosure-for-3d-printer-using-Ikea-box/


Here is another low cost solution for enclosure, made from PIR foam but with 3d printed hinges:

http://diy3dprinting.blogspot.com/2014/03/diy-3d-printer-enclosure-made-from-pir.html

Wooden enclosure heated by hair dryer to prevent warping:

http://diy3dprinting.blogspot.com/2014/03/diy-3d-printer-enclosure-made-from-wood.html

DIY 3d printer enclosure made from PIR foam and printable hinges

$
0
0
Thingiverse user the_digital_dentist made this insulation enclosure from polyisocyanurate (PIR) foam boards and printable hinges.


Project includes various types of printable hinges that hold cut foam pieces  


All the files and instructions:

http://www.thingiverse.com/thing:269586


Here is another DIY thermal enclosure made from plastic boxes:

http://diy3dprinting.blogspot.com/2014/03/low-cost-simple-3d-printer-enclosure.html

Wooden enclosure heated by hair dryer to prevent warping:

http://diy3dprinting.blogspot.com/2014/03/diy-3d-printer-enclosure-made-from-wood.html

DIY 3d printer enclosure made from wood with hair dryer heating element

$
0
0

The enclosure developed by repkid is a simple wooden box made from thin MDF sheets and wooden beams structure. It is insulated by double-ply cardboard glued to the inside of the box. To prevent ABS warping it is heated by simple household hair dryer.
Parts printed inside the heated enclosure on the left, and ABS part printed without heated chamber on the right with warping.

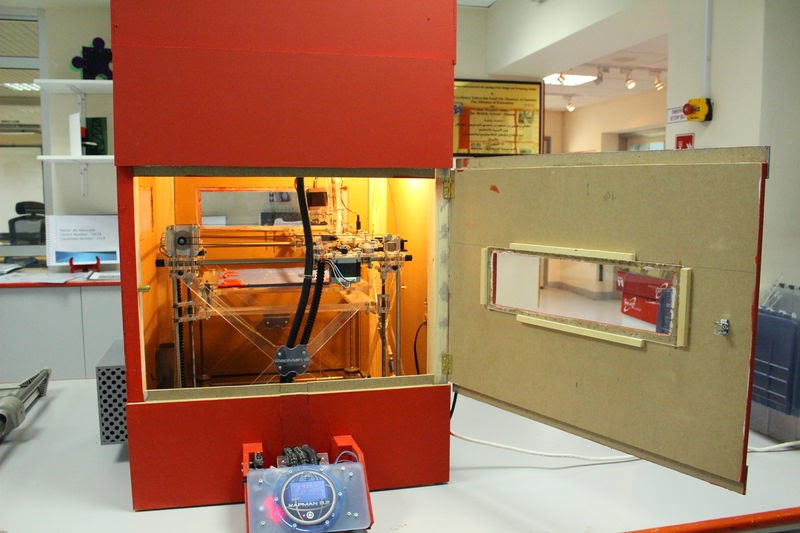
The enclosure with printer inside it

Lasercut thermal vents. They can be done with simple hand tools also 

Heater made from simple hair dryer

More advanced version of the enclosure with fumes extractor

Heated chambers for 3d printing are patented by some corporation and I'm not sure what implications patent law has on projects like this one ...


Project on RepRap wiki with more details:

http://reprap.org/wiki/Heated_Build_Chamber


See other DIY 3d printer enclosures:

Enclosure made from PIR foam and 3d printable hinges:

http://diy3dprinting.blogspot.com/2014/03/diy-3d-printer-enclosure-made-from-pir.html

Ultra simple enclosure made from plastic boxes:

http://diy3dprinting.blogspot.com/2014/03/low-cost-simple-3d-printer-enclosure.html


Some myths about PLA vs. ABS

$
0
0


.. but you probably know all of this ...

Converting 3d printer into tattoo machine

$
0
0


France is great. apparently you get money there from the government to mount tatto machines on 3d printer and draw circle tattoos on real people. cool.

In october 2013, a famous design school in Paris, ENSCI les Ateliers, hosted a workshop organised by the French Ministry of culture. The idea was to use images, videos and sound fallen in the national pubic domain and use them in a sort of “Mashup”. The event was called Public Domain Remix.
The students had one day (8 hours) to pick their digital material and transform it, hack it or remix it.
Le FabShop, was invited as a digital manufacturing expert to help the students realise their project.
After a short brainstorm, all the teams came up with similar ideas, except one, who really went out of the box with their concept. They had this silly idea of making a machine that could automatically create tattoos taken from a bank of images. They learned from le FabShop's representative that their concept was more than feasible. It could be prototyped by themselve, using the school's equipment.
In one afternoon, they managed to hack a Desktop 3D printer and enable it to trace on skin, using a pen instead of the extruder. The crowd was amazed and the Minister of culture even came to see the projects, but the young designers didn’t want to stop there. They wanted the machine to make REAL tattoos, on REAL skin, so they kept working on the project during their spare time, with some help from teachers and other students.
They borrowed a manual tattoo-machine from an amateur tattoo artist and found some artificial skin for the first tests. They chose to draw a simple circle. The perfect shape to test the precision of the process. It worked! But now they had to find a volunteer to be their “guiney pig”…
Somehow, they had no difficulty. A lot of people where excited by the idea of being the first human tatooed by a “robot”.
The big difficulty was to repeat the same exercise on a curve surface and on a material that has much more flexibility than silicone. Many tricks were tried to tighten the area around the skin ( a metal ring, elastics, scotch tape...) but the most effective one was a scooter’s inner tube, open on the area to be marked.

How to guide (remember to use your brain):

http://www.instructables.com/id/3D-PRINTER-X-TATTOO-MACHINE/


Welcome Wikifactory!

$
0
0
New community website and youtube channel about 3d printing. I welcome new colleagues on the scene!


I'll follow their site and I hope it grows and develops into new community hub...

http://static.wikifactory.org/


Max and Christina of Wikifactory


New interview with Diego Porqueras of Deezmaker by 3dHacker


Free webinar on industrial 3d printing and composite applications by GoEngineer

Shapeoko 3 handheld CNC announcement

Aluminum frame DIY 3D DLP Printer by Dan Beaven

$
0
0
Dan Beaven build his own DLP 3d printer. Here are the results:

Dans DLP resin printer


DLP projector and mirror


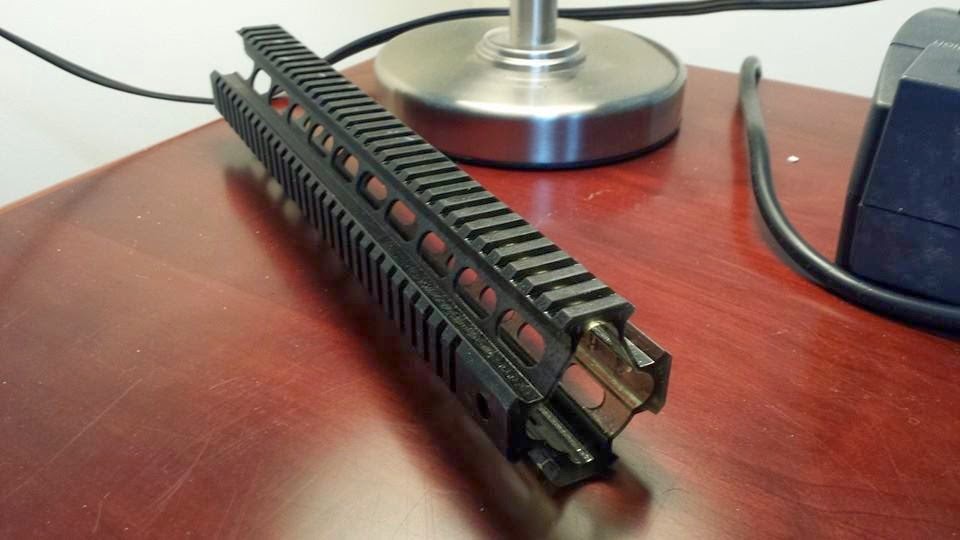
AR15 rifle rail printed on this machine with graphite powder added into resin


The printer is built out of 1″ T-slot aluminum and has a NEMA 17 motor that provides the Y-axis movement along two linear rods for the vat. The Z-axis stage uses a NEMA 23 motor and has a whopping 14″ of travel. Combined with a 104mm x 204mm build plate, this DLP can print some large size objects.
To cure the resin, he is using a 1080p DLP projector (Acer H6510BD DLP) with no modifications. To conserve space, it is mounted at a 90 degree angle, and uses a small mirror to reflect the image onto the build plate inside of the vat.
To pump the resin in and out of the vat, it is using an industrial peristaltic pump bought off the eBay, it needs to be flushed with isopropyl alcohol after each use!


Source, buildlog and much more details:

http://3dprintzothar.blogspot.ca/2014/03/3d-dlp-printer.html


For original design by Tristram Budel with very detailed construction guide see:

http://diy3dprinting.blogspot.com/2013/07/high-resolution-dlp-diy-3d-printer.html

T-Bone high performance 3d printing and CNC BeagleBone cape

$
0
0


New and powerful BeagleBone 3d printing and CNCing cape from Germany.

From T-Bone crowdfunding campaign:

The T-Bone is a cape for the BeagleBone Black, dedicated for motion control. These are 3D printers, laser cutters, milling machines, and other applications using stepper motors.
The T-Bone will come preprogrammed for Reprap Mendel 3D Printer. Best kown in the Prusa Mendel or Prusa i3 variant. The Software will include low level drivers, the printer application and a high level Web Interface for control. Just connect your steppers, heaters and sensors, configure the software and you are ready to print.
To join highest performance with flexibility and easy programming, we use a very powerful concept: Hard- and software abstraction layers! User interface, configuration, G-Code interpreter, and path planner are running on the BeagleBone. This makes it easy to use existing open source software components, using the existing toolchain on the Linux operating systems of the BeagleBone. Real-time communication with the BeagleBone is handled by a small microcontroller, placed on the T-Bone. The microcontroller is fully compatible with the Arduino toolchain, so everybody can easily modify it. Complex acceleration and velocity calculations for the stepper motors are done by dedicated motion controllers. These are dedicated hardware components, developed to get the maximum performance out of a given stepper motor without putting any workload to the host system.

The low level drivers for the motion controllers and realtime applications are written with the Arduino IDE in C. The higher level applications for G-Code analysis, motion control and web interface are written in Python. There are no special hardware drivers involved. Most of the hardware can be used on the built in Arduino or BeagleBone Black. All software will be released as open source software on github.

Here are the main features of the basic board: 
  • 5 stepper motor driver (run syncronized, 3 x up to 4 A, 2 x up to 1.5 A)
  • 10 inputs for end switches (two for each axis)
  • 3 inputs for incremental encoders (3 axis supporting closed loop control)
  • 3 inputs for thermistors
  • 1-wire interface for digital temp and other sensors
  • 2 high power outputs (for extruder and heatbed, up to 12 A)
  • 1 mid power output (for fans, LEDs, ..., also expandable)
  • Power supply for BeagleBone (5 V, 1.2A)
  • Input voltage 12 - 24 V
  • For more detailed description of the hardware features see here (to be continued...).

But that's not all. We are planning to create some additional expansion boards with special features. Here are some of the feature we are planning:
  • Support for rotary axis like driller, miller, ...
  • Support for laser cutters
  • External touch panel display
  • Support for other hardware platforms

And you can do even more! The software is easily adaptable to most CNC applications. If you want to connect your CNC mill you do not have to develop it from ground up, just adapt the printing logic a bit.

http://www.tbone.cc/


T-Bone Indiegogo campaign:

https://www.indiegogo.com/projects/t-bone-cape


Hoyt Carbon Matrix bow DIY 3d printed sight mount and stabilizer

Ultimaker 2 open source files available

3d printing and coffee at FabCafe Barcelona


AP interview with Enrico Dini about 3d printing ocean reefs for maritime environment restoration

Home workshop tour by Brent Rubell

$
0
0
Ever wanted to see what is in someones 3d printing workshop? Here is video tour by Brent Rubell showing his workspace and machines. Nice mancave.

He owns :
  • MBot 3D PVC Cube Dual Extruder
  • Printrbot LC 2012
  • Printrbot Simple v2
  • SeeMeCNC Rostock Max


Source: https://www.youtube.com/user/yetanothermacblog


I always enjoy watching other peoples workshops, EDC kits, posts and videos showing content of peoples bags ... some sort of fascination to see what other people do ...


QuadStrap low cost 3d printer with large volume and no 3d printed parts

$
0
0
QuadStrap is machine developed by Dr. Shauki Bagdadi, it is designed to produce other printers and therefore has no 3d printed plastic parts. It is ultra low cost with price at some 300 euro for 1 cube meter of print volume. That is very affordable!
It moves with transmission by mason cord or packing tape which further lowers the cost.


Project blog:

http://quadrap-3d-printer.blogspot.com/2014/04/quadstrap-on-github.html

Very detailed building manual:

https://docs.google.com/document/d/1zst22M3gSSgdRRNE0qyOXfLRTOhxbmwzwo-z1XO42rE/edit

GitHub repository with project files:

https://github.com/ShaukiBagdadi/quadrap


QuadRap in first version


There seams to be two or more different versions, so excuse me if mixing QuadStrap and QuadRap variants ...

If you are interested in different low cost 3d printer with no 3d printed or CNC parts take a look at Delta Twister, it also has very detailed step-by-step building tutorial:

http://diy3dprinting.blogspot.com/2014/03/delta-twister-ultra-low-cost-diy-3d.html


New Airwolf 3d JRx hot end printing polycarbonate

$
0
0
Here is video from Airwolf 3D showing their new JRx hot end in action printing polycarbonate and other materials in higher temperatures.


http://airwolf3d.com/


New Cyrus 3d printer

$
0
0
I didn't know that there was an OLD Cyrus printer but here is a new version. New day, new 3d printer.


Tech specs:
  • Print technology: Fused filament fabrication (FFF)
  • Nozzle Temperature: 180° – 300° C
  • Heated Bed: 40° – 100° C
  • Power: 400watt
  • Dual head ready
  • Wireless/Network printing ready
  • Silent operation
  • Built-in LCD panel with onboard SD card support
  • Software: Repetier Host
  • Printer size: 370 mm x 400 mm
  • Resolution:up to 20 micron
  • Nozzle diameter: 0.4 mm
  • Travel speed: 10mm/s – 350mm/s
  • Print Speed: 10mm/s – 300mm/s
  • Filament : 1.75 mm
  • Microstepping: 1/32
  • Build volume: 195 mm x 195 mm x 200 mm
  • Price: 1,399.99 euro ex VAT, (1,930 USD, 1,161 GBP)

http://www.cyrusprinter.nl/


Viewing all 2481 articles
Browse latest View live