3D Printing Providence leader Matt Stultz gives the lowdown on a variety of some of the new and exciting advanced 3D printing materials and their uses. The range of filaments covered includes: thermochromic, conductive, Laywood, Laybrick, HIPS, nylon, and TGlass.
↧
Matt Stultz presents advanced materials for 3D printing on video by MAKE
↧
SkyDelta - Prototype Tensioned-Line Delta 3d printer
Brandon Heller made this Delta with very innovative and interesting design.
From project description:
Detailed post about SkyDelta:
http://designmakeshare.wordpress.com/2013/09/16/introducing-skydelta/
SykDelta Github:
https://github.com/brandonheller/skydelta/
![]()
From project description:
SkyDelta is a new style of open-source RepRap 3D printer. Similar to deltabots like the Kossel, Rostock, Cerberus, Wolfstock, and many others, it has a triangular-prism frame. However, instead of using linear rails and rigid rods to move the print head through space, SkyDelta employs tensioned lines.
Detailed post about SkyDelta:
http://designmakeshare.wordpress.com/2013/09/16/introducing-skydelta/
SykDelta Github:
https://github.com/brandonheller/skydelta/

↧
↧
Honeycomb - free browser based parametric CAD
Honeycomb is browser based sleek looking and free parametric CAD currently in beta. It looks much more usable than standard programmatic CAD.
http://honeycomb3d.com/
![]()
http://honeycomb3d.com/

↧
Mobile phone 3d scanner application by ETH Zurich
Technology developed by ERH Zurich enables you to use your smartphone as 3d scanner. It is patent pending and not yet available for general public, but it shows a general direction of technology. There are probably development teams and investors crying now since it could make specialized hardware 3d scanners obsolete.
From source page:
http://cvg.ethz.ch/mobile/
![]()
From source page:
Today the Computer Vision and Geometry Lab of the Swiss Federal Institute of Technology (ETH Zurich, Switzerland) announced on December 3, 2013 recent research results turning a normal smartphone into a mobile 3D scanner. 3D scanning aims to capture the geometry of the 3D world, however most existing solutions require a complicated setup, are often hard to use and might not always work outdoors. The technology was demonstrated publicly for the first time today at the International Conference on Computer Vision in Sydney, Australia.
Instead of taking a normal photograph, a user simply moves the phone around the object of interest and after a few motions, a 3D model appears on the screen. As the user keeps moving, additional images are recorded automatically and used to extend the 3D model. As all calculations are performed directly on the phone, the user gets immediate feedback and can select additional viewpoints to cover missing parts of the 3D model. This is an important advantage compared to solutions that batch process all the images in the cloud at a later time.
The app also makes it possible to visualize the state of the 3D scan from different viewing angles, allowing the user to cover all the areas of the object he is interested in. Having a solution on a mobile phone enables the acquisition of 3D scans on-the-fly anywhere. Our approach works in a wide variety of settings, including low-light conditions such as inside a museum. A user can capture a 3D model of a museum piece and interactively study it at home later. After reviewing the model, a user might decide to upload his 3D data to a cloud service to further refine the results.
By using the inertial sensors of the phone, the scanning process can be made simple, intuitive and robust. After the 3D capture is started, the system automatically determines the correct moments to extract camera images based on the user motion.
Contrary to image-only 3D capture solutions the app is able to determine the absolute size of the scanned 3D object, as well as the vertical direction. Because of the complexity of the calculations needed to reconstruct hundreds of thousands of points, the graphics co-processor (GPU) of the phone is used to enable a faster reconstruction and increase interactivity for the user.
The technology also allows the 3D capture of faces, giving a third dimension to portraits, profile pictures or images of loved ones.Source:
Having a convenient way of getting 3D models of everyday objects, users will now be able to copy real-world objects by scanning a full 360 degree model of an object. The resulting 3D model can be used for visualization or augmented reality applications, or even be used for 3D printing, potentially at a remote location, effectively enabling the user to replicate an object.
The patent pending technology was developed exclusively by ETH Zurich and can run on a wide range of current smartphones.
http://cvg.ethz.ch/mobile/

↧
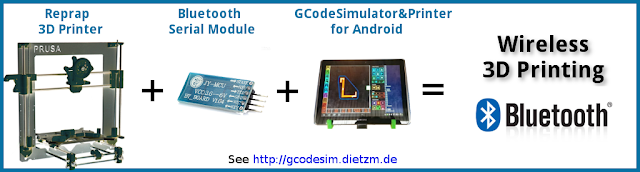
GCode Simulator & Print software - controlling 3d printing on PC, Android or via Bluetooth
GCode Simulator is software package of several programs / apps that run on PC or Android device enabeling you to simulate G-Code 3d printing on your PC and on Android and giving you full control of compatible 3d printer in paid (1,99 €) version.
This is very useful since there is plenty of very affordable low cost Androide devices such as tablets that can provide you with powerful touch screen 3d printer controller.
GCode Simulator also supports wireless printing over Bluetooth. GCode Simulator & Printer can connect to Bluetooth enabled 3D printers. Any RepRap 3d printer based on RAMPS can easily be extended to support Bluetooth by connecting a JY-MCU Bluetooth serial module.
![]()
Video of GCode simulator on PC making a 3d printing simulation:
Video of GCode simulator in Android environment:
Here is Steve Gerbers video of GCode Simulator running on ultra cheap Android tablet and working great with Cerberus delta printer:
For a full set of features and details visit GCode Simulator & Printer homepage
http://www.dietzm.de/gcodesim/
![]()
This is very useful since there is plenty of very affordable low cost Androide devices such as tablets that can provide you with powerful touch screen 3d printer controller.
GCode Simulator also supports wireless printing over Bluetooth. GCode Simulator & Printer can connect to Bluetooth enabled 3D printers. Any RepRap 3d printer based on RAMPS can easily be extended to support Bluetooth by connecting a JY-MCU Bluetooth serial module.
Video of GCode simulator on PC making a 3d printing simulation:
Video of GCode simulator in Android environment:
Here is Steve Gerbers video of GCode Simulator running on ultra cheap Android tablet and working great with Cerberus delta printer:
For a full set of features and details visit GCode Simulator & Printer homepage
http://www.dietzm.de/gcodesim/

↧
↧
RAMPS v1.4.2 open source control board
RAMPS version 1.4.2 open source controller electronics board is available.
![]()
From product page (google translated from German):
The new RAMPS 1.4.2 promises significantly fewer failures and has other improvements , such as 2 motor connections per socket or a labeling slots . The RepRap Arduino Mega Pololu Shield (short: RAMPS ) is the centerpiece of a RepRap 3D printer . On the board there are all electronic components such as mosfets transistors , fuses, plug-in connections for the Pololu stepper motor drivers, etc. Previous versions of the shelf had the problem that the electronics are often failed.
The RAMPS 1.4.2 is equipped with automotive fuses instead of the usual thermal fuse now. These new backups are less sensitive to heating . In order to enhance availability, the strength of the traces of 35 microns were increased to 70 microns and its course optimized. The limit switches now have a capacitor that prevents accidental turn off .
Further improvements can be found at the bases for the Pololu motor driver . You have the RAMPS 1.4.2 through two ports and can use it to drive two motors per connection . There is now a slot for external reset, which has advantages when the RAMPS is installed in an enclosure , since you do not have to do without the reset button . By labels on the slots for a warmed bed , fan and extruder also the wiring is simple .
Our RAMPS 1.4.2 is of course open source. The board is a fork of the open-source project of ultimachine / Ramps 1.4 ( https://github.com/GermanRepRap/Ramps-1.4.2 ) and retrieve in Github .
It can be applied to all RepRap 3D printer with RAMPS electronics, such as the PRotos V2, use and runs on RAMPS 1.3 and 1.4 firmware with no change , so it can easily be exchanged for existing RAMPS .
The following connections are provided:
2 * extruder heating
1 bed * Heating
3 * Temperature sensor for Extruder 2 and 1 bed ( No more board longer necessary )
5 * for Pololu motor base
6 * opto end stop (3 * Min, Max 3 * )
1 * Connection option for SD card reader and LCD
1 * Connection for external reset
1 * Connection for FAN adapter.
Full open source documentation if you want to build it youself:
https://github.com/GermanRepRap/Ramps-1.4.2
You can buy it for 59,95 euro at:
https://shop.germanreprap.com/en/product?info=289
↧
Improv - low cost powerful open hardware engineering board
Improv is very powerful and affordable electronics board that could replace Raspberry Pi in 3d printers and provide much more processing strength. connectivity and control options. I have not found any 3d printer projects with it. If you know any, let me know.
http://makeplaylive.com/index.html#/open-hardware/improv
Technical specifications from product page:
![]()
http://makeplaylive.com/index.html#/open-hardware/improv
Technical specifications from product page:
Open, Modular Design
The Improv is a modular engineering kit that comes with a CPU card and a separate feature card to connect it to. The CPU card powers the device while the feature card provides convenient access to the on-board capabilities of the CPU card through a variety of ports and pins on it.
This unique design allows one to have multiple CPU cards for different projects, upgrade the kit by ordering new CPU cards for additional features or feature cards for different sets of ports and off-board components.
Improv comes pre-installed with the Linux-based Mer operating system. We chose Mer because it has been designed specifically for device development, has a thriving community of both companies and enthusiasts and has a proven open governance model directing development. You aren't locked into this, however: you can install the operating system of your choice.
Hardware
Included CPU card capabilities
Processor: ARM® Cortex™-A7 1Ghz dual core (Allwinner A20)
GPU Mali400MP2 with OpenGL ES 2.0/1.1
RAM 1GB DDR2
Storage 4GB NAND flash
Micro SD card reader
Video Micro HDMI (video + audio)
RGB/TTL
USB Micro USB OTG
USB2 host
Networking 10/100 Mbit Ethernet
Other buses i2c, 8 GPIO, UART0
Weight Under 40 grams
Dimensions 85.6x54 mm
Feature board ports
USB Fullsize USB2 host port
Ethernet 10/100/1000 RJ-45
UARTO Pins:
1: GND
2: 5VDC
3 TX
4: RX
EEPROM 32K Serial EEPROM (i2c address 0x54)
SATA SATA II interface connector
Casing Sturdy metal case with guides for docking with the feature board
Power 6-12VDC, up to 2.5A. Recommended 9VDC or less.
Green power status LED.
Energy consumption (these numbers are for guidance only; exact draw will vary depending on use case):
At idle: 3.1-3.4 Watts (344mA @ 9V).
With a SATA drive, flash drive connected to OTG port,
keyboard and 2.4Ghz mouse via USB2 Host Port,
Ethernet active, playing a 720p movie: 4.4Watts (488mA @ 9v).
44 PIN DIL Pins:
1-29: RGB/TTL interface
30-31: i2c SDA/SCL lines
32-39: 8 GPIO for user's choice
40: uBoot (Short to GND to enable)
41-42: TX/RX UART0
43-44: GND/5VDC
Dock 68 pin header with guide rails and push-button ejector
Weight Under 60 grams
Dimensions 100x74 mm
Mounting holes 3mm diameter
92x67mm center-to-center
Manufacturer suggested retail price: US$75
Software
Pre-installed operating system
Distribution Mer OS
Kernel Linux 3.x: SunXI 3.4, upstream Linus tree merge ongoing
Init systemd
Userspace GNU
Package format RPM
Software management zypper
Build service dedicated OBS farm
Display X.org, Wayland, framebuffer, Linux console
Toolkits Qt4 with QtQuick1, Qt5 with QtQuick2, KDE Platform Libraries 4
Graphical environments KDE Plasma Desktop and Plasma Active
Developer SDK Mer Platform SDK

↧
DIY 3d printer enclosure and fume exhausting system
3D printing fumes are NOT good for you. Malcolm Langille made an enclosure for his Type A 3d printer with exhaust system to extract the fumes outside of his house.
I wonder how the temperature change and build surface cooling due to strong air movement affects the 3d print quality.
Source page with more details:
http://www.3dhacker.com/category/667/Type-A-Machines/listings/519/Enclosure-External-Exhaust-and-Fan.html
http://www.thingiverse.com/thing:197099
![]()
![]()
I wonder how the temperature change and build surface cooling due to strong air movement affects the 3d print quality.
Source page with more details:
http://www.3dhacker.com/category/667/Type-A-Machines/listings/519/Enclosure-External-Exhaust-and-Fan.html
http://www.thingiverse.com/thing:197099


↧
Liability law and 3d printing
Who is liable when someone gets hurt by 3d printed object? Associate Professor Nora Freeman Engstrom warns that in a world of 3-D printing, people may not be protected under traditional product liability law. Rather, they could be left to pursue harder-to-prove negligence lawsuits.
She gives several scenarios and possible future legal practices.
Video by Stanford University
She gives several scenarios and possible future legal practices.
Video by Stanford University
↧
↧
Daily 3d printing - replacement notebook key
3d printable replacement key for notebook keyboard. Nice work. I have several keyboards missing keys. Some fine knifework was needed to clean the part ...
![]()
http://www.thingiverse.com/thing:199914 by fckmakerbot

http://www.thingiverse.com/thing:199914 by fckmakerbot
↧
Pico full metal hot end by B3 Innovations
Design Features:
- Reduced leak/failure points with only one conjunction
- Heavyweight that is lightweight: 29g making it the lightest all-metal universal hot-end
- Compact size – including nozzle: 56mm x 14.3mm dia. making it the smallest footprint of all-metal universal hot-ends
- High strength and durable
- Meltdown-free, long-lasting, plastic-free design
- Built-in 13mm wrench flats
- High-efficiency integrated vertical heater block. Threads inhibit heat transfer in threaded heater blocks
- Precision machined with tolerances meeting aerospace grade
- Precision-machined 45 degree chamfered nozzles for a leak-resistant compression fit
- No Kapton tape
- choice of nozzle size: .35, .4, .5, or .6mm
Heater Features:
- US made heaters replace sub-par imported heater cartridges
- 40 Watts, 12 volts or 24 volts
- High-temperature 25in DuraFlex® leads
- 6.23mm diameter (¼in) (+/- 0.04mm) by 20mm long
http://www.kickstarter.com/projects/b3innovations/pico-all-metal-hotend-for-reprap-3d-printers
http://www.b3innovations.com/

↧
Delta4 printer with four Delta printers stacked in a tower frame
There are four Delta 3d printers stacked in one frame making a small footprint production unit - a tower printer farm.
↧
3D printed skull used to train for brain surgery
From source article:
Vicknes Waran from the University of Malaya in Kuala Lumpur, Malaysia, and colleagues created the model using the latest generation of 3D printers, which can print plastic in a variety of textures, from rubbery to hard. By tweaking the printer's settings, they mimicked the consistency of skin, bone and membranes to build up the layers inside a skull. To reproduce a jelly-like tumour, plastic was injected into an anatomically accurate cavity created by the printer, based on scans from a patient. It was then coloured red to add realism.
The skull is an improvement over existing models that use a single material because it allows trainees to see, feel and even hear how each type of tissue responds. Patient-specific replicas can simulate different medical conditions, allowing students to rehearse an entire operation ahead of time.
The researchers also made models of the head. These can be reused, but the model brains with internal structure are custom-made for each practice session. Each costs about $600 to make, which makes it an affordable option.
The team has already created even more sophisticated model brains with cavities that students can probe. "It bleeds and has fluid for brain endoscopy," says Waran.
Source:
http://www.newscientist.com/article/dn24741-3dprinted-skull-simulates-sensations-of-brain-surgery.html
↧
↧
Proto Pasta carbon, high temperature and polycarbonate alloy PLA / ABS filaments
Proto Pasta has some new filaments with enhanced properties then regular PLA / ABS.
![]()
Video from their Kickstarter:

Video from their Kickstarter:
Proto Pasta offers:
Carbon Fiber Reinforced PLA
Proto-Pasta Carbon Fiber reinforced PLA is made from NatureWorks 4043D PLA Resin compounded with 15% by weight Tenax short chopped Carbon Fibers. It is designed to be stiff, or to resist bending. It is the stiffest material we offer and makes parts with an incredibly solid feel. When printed, this material is a dark glossy black that glitters slightly in direct light from the fine chopped fibers reflecting the light.
Carbon Fiber Reinforced PLA does not require a heated bed and prints much like unreinforced PLA filament. The main difference is that it is brittle and care must be taken when handling the filament and loading the printer.
We have had good results printing at 190C-210C using a .5mm nozzle and direct-drive spring loaded pinch-roll style extrusion head. Layer adhesion is excellent and the material has low warpage.
High Temperature PLA
Proto-Pasta High Temperature PLA is made from a custom compound consisting of mineral filled impact modified PLA with a nucleating agent to help promote crystallization. Crystallization after printing is what gives this material added heat resistance. To fully realize this advantage, parts must be soaked in hot water or an oven after printing at 60C-80C for 3-5 minutes. This crystallizes the material and makes it much more heat resistant. It does not require a heated bed to print well, but this may help crystallize the material after printing and make oven soaking unnecessary for some parts. High Temperature PLA is a glossy off white, or very light gray. Printed parts look good and have slightly more texture than standard PLA. This material is not translucent like standard PLA.
We have had good results printing at 190C-210C using a .5mm nozzle and direct-drive spring loaded pinch-roll style extrusion head.
Layer adhesion is good and the material has low warpage.
Polycarbonate/ABS Alloy
They also offer Reusable filament Folding Spool
![]()
http://www.proto-pasta.com/
Proto-Pasta Polycarbonate-ABS (PC-ABS) Alloy is an incredibly tough material designed for strong, resilient parts. When printed, PC-ABS is bright glossy white.
Proto-Pasta PC-ABS Alloy can print well. It is very moisture sensitive and even if stored bagged with desiccant, drying in an oven for ~ 1hr at 85C-95C may be required for bubble free high strength prints. Layer adhesion can be an issue if the part is large or the temperature is too low. We have had good success printing parts ~60mm long at 260C-280C using a .5mm nozzle and direct-drive spring loaded pinch-roll style extrusion head. A heated bed may help warpage and layer adhesion on larger/thicker parts.
 |
| Proto Pasta filament properties |

http://www.proto-pasta.com/
↧
MadeSolid PET+ 3d printing filament
PET+ specifications:
- Flexible Strength
- 100% Recyclable
- FDA Approved for contact with foods
- Easy Adhesion (No heated bed required. Sticks to blue painters tape)
- Hydrophobic: Doesn't absorb water like nylon does
- High qualify spooling and extrusion. Consistent diameter and no bubbles
- More flame resistant than PLA and ABS
- PET+ is compatible with 3D printers that use 1.75mm size filament.
- Price: $34.99 for 1 lbs / 0.45kg and $69.99 for 2.2lbs / 1kg.
- Available in translucent Clear and in opaque Black, White, Green, and Red.
- PET+ is stronger than many ABS filaments and has the high print success rate of PLA. It is ideal for functional objects that need to combine toughness with flexibility, such as phone cases, wearables, robotics, and mechanical parts.

↧
Dissolving PLA support material and leaving ABS untouched with caustic soda (Sodium Hydroxide) in ultrasonic tank
PLA and BAS are most used materials in 3d printing. If we used PLA as support meterial, how can it be removed from ABS without damage to ABS? PLA can be dissolved with caustic soda in ultrasonic tank.
Bertho Boman experimented with various concentrations and presented results on his blog:
http://www.vinland.com/blog/?p=162
![]()
Extensive details and experiments with other methods and how to dissolve PLA fast when no other material is involved:
http://www.vinland.com/blog/?p=68#more-68
Here is video showing the process with professional ultrasonic tank and caustic soda (sodium hydroxide) that takes 3 hours to remove PLA support material from ABS part. 217 grams is added to 3 liters of water heated at 60C.
Ultrasonic tank used in the video is priced around 1300 USD, but it can be found much cheaper at some 300 USD.
They talk about dissolving PLA in .stl podcast (great podcast btw):
RepRap forums discussion:
http://forums.reprap.org/read.php?1,153508,199753
Bertho Boman experimented with various concentrations and presented results on his blog:
This time I tested several different plastic types and varying strength Sodium Hydroxide.
1.0 Molar: 40g per liter water
1.8 Molar: 72g per liter water (same as the video)
3 Molar: 120g per liter water
6 Molar: 240g per liter water
Test Result:
After 5 hours in the ultrasonic tank @ 60°C there was no visual effect or surface hardness change evaluating the samples under a microscope of the different plastic types except the PLA.
http://www.vinland.com/blog/?p=162

Extensive details and experiments with other methods and how to dissolve PLA fast when no other material is involved:
http://www.vinland.com/blog/?p=68#more-68
Here is video showing the process with professional ultrasonic tank and caustic soda (sodium hydroxide) that takes 3 hours to remove PLA support material from ABS part. 217 grams is added to 3 liters of water heated at 60C.
Ultrasonic tank used in the video is priced around 1300 USD, but it can be found much cheaper at some 300 USD.
They talk about dissolving PLA in .stl podcast (great podcast btw):
RepRap forums discussion:
http://forums.reprap.org/read.php?1,153508,199753
↧
Luminar Products 3D Super Extruder enables you to 3d print with industrial grade plastic welding filament
Powerful large extruder project that enables you to 3d print with industrial grade plastic welding filament in several materials like: PVDF, PVC 1, PVC 2 & CPVC, Polyethylene, HMW and Polycarbonate.
From Kickstarter description:
http://www.luminarproducts.com/3d-super-extruder-press-release.html
http://www.kickstarter.com/projects/172237528/improved-3d-printer-extruder-allows-more-plastic-o
![]()
From Kickstarter description:
There are generally two types of thermoplastic that are available for filament type 3D printers, ABS and PLA plastics. These filaments are available in many colors and diameter sizes of 1.75mm & 3mm (0.070 & 0.118 inch). Currently these are pretty much the only sizes that can be used in these 3D printing machines. There are other types of thermoplastic available today that are available as an extruded filament however these have larger cross-sectional diameters of 0.125, 0.156 & 0.188 (3.18mm, 3.96mm and 4.76mm). These are sold as plastic welding rod and are typically used for joining sheets of plastic together. These larger diameter filaments come in many different types of plastic that have for the most part not been used by the 3D printing community. Many types of plastic welding rod are considerably less expensive per pound than the common printer filament of ABS and PLA. So if this material could be made to work in a plastic printer you could have a greater variety of plastics for printing and lower material cost. Our solution is to create a new extruder that can be fitted to existing 3D printers to enable these printers to use all of these different diameters of filament and handle the wider range of processing temperatures for the different thermoplastics.
We have already built 3 versions of our NEMA 23 extruder so far with improvements being incorporated to each new version. We have run the extruders with various materials and are convinced we have a good product here. Our plan is to manufacture our extruders in two sizes. A large extruder driven by a NEMA 23 stepper motor and a smaller version driven by a NEMA 17 stepper motor. The larger version will be able to run all of the filament sizes from 1.75mm to 4.76mm (0.070 to 0.188 inch). The smaller version will run filament sizes 1.75mm to 3mm (0.070 to 0.118 inch). The heater block of our extruders and the nozzles are made from copper for faster and more stable temperature control. Several nozzle sizes will be available for printing various sizes and types of parts.
Our latest version of this extruder is larger than current extruders and has design improvements to allow it to take advantage of the higher temperature ranges required by the various types of thermoplastic available in the larger diameter sizes. These plastics have properties that will greatly enhance a 3D printer's usefulness by allowing it to make parts that can be used in many different environments.
The following are some of the types of common thermoplastic welding rod along with several uses and properties that would make them an attractive candidate for a 3D printed part.
PVDF Chemical restiveness of PVDF and its long lasting strength will make this a popular choice for laboratories or clean-rooms where tanks, tank furniture, fittings or cassettes could be made quickly from a computer library of components or as needed from a 3D CAD drawing for a custom application.
PVC 1, PVC 2 & CPVC with their ability to withstand UV would be great for any sort of outdoor applications or unique PVC pipe fittings. These materials also resist acids and alkalies and are commonly used in chemical processing applications.
Polypropylene makes parts with a hard surface and resists many chemicals and solvents. One interesting use for this material is its ability to make parts that have a living hinge on them, like used on the lid of a Tic-Tac candy box. It is also commonly used in clean rooms for chemical benches, tanks and enclosures.
Polyethylene available in low or high density formulations are very resistant to moisture as well as many chemicals.
HMW makes parts with a slippery surface useful for many industrial applications such as chain guides or rollers. It has excellent impact strength and good wear resistance.
Polycarbonate is synonymous with impact resistance. This transparent material has excellent impact resistance over a wide temperature range. Parts made from this plastic would have great strength and flexibility.
Our extruders, are of course, not limited to these materials and can also extrude ABS, PLA, any of the Taulman filaments, nylon, PETT, HIPS, PVA and others from 1.75mm diameter to 4.75mm diameters (0.070 to 0.188 inch). Many of these materials have previously not been available to the 3D printer community. It is our hope that this extruder will change that and be a benefit to all 3D printer owners who need parts with better strength, chemical resistance, UV resistance or other properties that these various plastics can provide.
Why are we so proud of our extruders?
- Very compact design with a mid mounted, integrated heat sink for better cooling of both filament drive parts and stepper motor.
- Extremely solid one piece aluminum body with mounting options on top, bottom or either side.
- Copper heater block and nozzle for faster, more stable temperature control.
- Plans for making two sizes of extruder, a NEMA 17 stepper motor size for smaller 3D printing machines or the larger, more powerful NEMA 23 stepper motor extruder for larger, faster moving 3D printers.
- Precision quality, our extruders feature a spring loaded dual wheel filament drive mechanism for positive filament control. The drive wheels are made from steel and are hobbed for traction.
- Our NEMA 23 extruders will be able to accommodate 5 filament sizes (1.75mm, 3mm, 1/8, 5/32 and 3/16 inch diameter filaments) and multiple plastic options with nozzle options for various materials and extrude diameters.
http://www.luminarproducts.com/3d-super-extruder-press-release.html
http://www.kickstarter.com/projects/172237528/improved-3d-printer-extruder-allows-more-plastic-o

 |
| Hot end made from copper |
↧
↧
3d printable electronic circuit tutorial by Mikey77
Mikey77 made a small 3d printable electronic circuit and created a detailed how-to guide on Instructables. It is made on a regular FFF DIY 3d printer (Replicator 2) shaped like network of grooves and holes in a printed board filled with DIY conductive glue which closes the electric circuit.
Video of a working printed circuit:
Detailed building instructions, .stl circuit files and more photos:
http://www.instructables.com/id/3D-Printing-3D-Print-A-Solderless-Circuit-Board/?ALLSTEPS
DIY conductive glue which closes the electric circuit:
http://www.instructables.com/id/Make-Conductive-Glue-and-Glue-a-Circuit/?ALLSTEPS
![]()
![]()
![]()
![]()
Video of a working printed circuit:
Detailed building instructions, .stl circuit files and more photos:
http://www.instructables.com/id/3D-Printing-3D-Print-A-Solderless-Circuit-Board/?ALLSTEPS
DIY conductive glue which closes the electric circuit:
http://www.instructables.com/id/Make-Conductive-Glue-and-Glue-a-Circuit/?ALLSTEPS


↧
Cartesian Co EX¹ desktop electronic circuits printer
From Kickstarter descrption:
The Cartesian Co. printer EX¹ transforms electronics and prototyping in the same way that 3D printing has made things possible that were inconceivable even 5 years ago.
The EX¹ printer is not designed to create any 3D object like normal 3D printers. It’s been crafted and designed for one key purpose, to allow you to 3D print circuit boards, layering silver nano particles onto paper or any suitable surface to rapidly create a circuit board. In 2011, an article in Wired said that within two years 3D printers could print electronic circuits. Two years to the day, we’re announcing the EX¹, a printer that allows you to rapidly 3D print circuit boards.
The process is as easy as clicking File > Print. This lets you create electronics, just as you've envisioned - wearable electronics, paper circuits, printed computers or whatever you imagine. A 3D printer creates the objects of your imagination; the EX¹ lets you create the electronics of your imagination.
Wearable circuits
One capability of the EX¹ we're really excited about is the ability to print straight onto fabric. Anyone who has used conductive thread will tell you how frustrating it is when the thread breaks but you can't find the break! With the EX¹ you can print circuits straight onto the material of your choice.
How it works
The reason we created the EX¹ is simple; we got sick of making PCBs by hand. We got so sick we set out to find a way to make circuits quickly and effortlessly.
The basic principle of operation is simple. Two inkjet cartridges similar to the ones in your desktop printer print images on a substrate, but instead of ink they lay down two different chemicals. When these two chemicals mix, a reaction occurs to produce silver nano particles, leaving a silver image on the substrate.
After a year of working on the EX¹ we believe we've finally created a printer that will allow people to design and make radically new things. With a print area of 17.5 x 8cm (6.9 x 3.2in) you'll be able to print boards well above the size of what you can design in the free version of Eagle. At a size of 43 X 32 X 17cm (17 x 12.6 x 6.7in) its roughly the same size as your Canon or Epson printer at home. Weighing in at only 6kg (13.5lb) it's very portable and will be perfect to take to work or your local hackerspace.
Software
How hard is it to use your home printer or office photocopier? Not hard (we hope), and that's exactly what we've aimed for with our software.
But of course printing electronics isn't exactly the same as printing a cute baby photo. We give you complete flexibility with our software, anything from just importing an image and clicking print, all the way through to having control over every printing variable.
We've included presets and tools to make getting into making electronics as easy as possible, while at the same time allowing experienced pros to push the boundaries of what can be done.
Materials
As well as making it easy for people to create complex circuits we wanted to make it easier to put them together. You can always solder the circuits but if you're not at that stage yet we've been successfully using conductive glues that's as easy as finger painting. In fact, when you use it with a paper circuit it almost IS finger painting!
We're developing new ways of treating and coating everyday materials to be printed on, so there's nothing holding you back from creating whatever your heart desires.
The materials you can print onto is only half of the equation. Equally important are the inks you're using to do so. We're actively working on new ink formulations and processes to ensure using your printer is as easy and reliable as possible.
The inks we are using are very safe and we won't be gouging you for refills like some printer companies out there (we hate that too!).
I expected more DIY solutions for electronic circuit printing until now. Maybe they will come in future. This product will also compete with small DIY cnc mills / routers that can cut out PCB boards.
Company page:
http://www.cartesianco.com/
They finished successful Kickstarter:
http://www.kickstarter.com/projects/cartesianco/the-ex1-rapid-3d-printing-of-circuit-boards
Here they demonstrate printed electronic circuits on 3d printed PLA:

 |
| Working electronic circuit printed on paper |
 |
| Printed wearable electronic circuit |
↧
SAV MkI 3d printer electronics board
SAV MkI open source control electronics board made by RepRap CloneWars community is on Indigogo now.
From RepRap wiki SAV MkI page:
RepRap Wiki page with detailed information:
http://www.reprap.org/wiki/SAV_MKI
Indiegogo campaign:
http://www.indiegogo.com/projects/sav-mki-3d-printer-electronics
Technical specifications:
Processor
Atmel AT90USB1286 Microcontroller @16 MHz
Native USB interface
Flash: 128KB
RAM: 16KB
EEPROM: 128KB
Supply: 4.2V to 5.5V
Voltage input: 12V-15V
Internal regulated voltage: 5V and 3.3V
Logic supplied by on-board voltage regulator through Vin Logic can also be supplied through USB (internal source selection).
Connectivity
Edge connectors enabling right-angle connections
2 x 15A switching connectors with high power N-MOSFETs.
1 x switching N-MOSFET for low power fan.
1 x on-board uSD connector
Bluetooth interface output levels adjusted for 3.3V logic (connected to UART1 - Rx and Tx).
4 x Endstop connectors supplied @ 5V. Includes X, Y, Z and E
2 x Thermistors
14 Extra pins available for expansion and development, with the following capabilities
UART1 (RX and TX)
I2C (SDA and SCL)
SPI (MOSI, MISO, SCK)
PWM pin (1)
Analog I/O (6)
JTAG (uses some of the ADC pins)
Dimensions: 100mm x 65mm
SW, Firmware and SDK
All preassembled SAV-MkI come pre-loaded with a bootloader and Marlin firmware. You may also upgrade the firmware, modify calibration data for use with another style of RepRap, or perhaps assemble your own board.
Highlights
Marlin (pre-loaded) - Marlin's main branch already supports the SAV-MkI (MOTHERBOARD==83)
you can also get a pre-configured version of Marlin for the SAV MkI.
Bootloader: LUFA's CDC Bootloader
SDK: Arduino IDE with Teensy add-on.
Windows users only, will need to install USB Serial device (will be downloaded with the Teensy environment).
To use a SAV MkI, you will need to load appropriate USB drivers, you can get them from:
Windows-only: USB Serial Device (PRJC.com)
Compatible Firmware
Marlin Marlin: Official support, use (MOTHERBOARD==83)
Repetier List_of_Firmware#Repetier-Firmware: No support yet.
(Other firmwares are currently untested but any firmware for an arduino mega should work with proper pin setup).
![]()
From RepRap wiki SAV MkI page:
This 3D printer board electronics has been designed and developed using all the great contributions and feedback from the RepRap CloneWars group in Spain. All shortcomings from other similar boards have been addressed providing an affordable yet feature rich 3D printer electronics. The SAV MkI, improves upon the previous production-grade electronics set (Gen6, sanguinololu) by adding well dimensioned power MOSFETS, SD card support, on-board regulated 3.3V to connect to 3.3V level peripherals such us Bluetooth, as well as improving on USB link's reliability and reducing cost by eliminating the FTDI UART chip.
The SAV MkI is a derivative of Teensylu and the Printrboard, an AT90USB1286 development board originally based on Sanguinololu. The Atmel AT90USB1286 MCU has an on-chip USB, removing the need for the FTDI UART (USB-to-serial) IC. On-chip USB means that you will get faster firmware upload times, communications, g-code transfer and reduce the time file transfers take from the host to the on-board microSD card. The AT90USB connects at any baud rate regardless of firmware configuration, and operates virtually free of serial communication errors/pauses.
In addition, the SAV MkI has broken out the second UART with its levels adjusted to 3.3V logic. You will be able to connect any HC-05 or HC-06 bluetooth dongle to wirelessly control your printer.
Features
Feature rich yet affordable 3d printer electronics. The SAV MkI has been designed after taking feedback from the Clone Wars RepRapers out there. We have come through with an electronics that we believe will meet your expectations.
- Hotend and heatbed well dimensioned FETs that can take up to 15A without heat-sinks.
- High speed native USB interface connectivity going up to 12Mbps so that there is no lag on your prints.
- As opposed to the 38400-115200 baud via FTDI. The end result is: virtually no serial communication errors (common with Sanguinololu and Generation_6_Electronics).
- 12V built-in fan controller for your layer fan or hot end cooling.
- Micro SD reader for autonomous printing.
- Bluetooth dongle (dongle not provided, tested with HC-05 and HC-06) interface adapted to its logic levels for wireless operation.
- Expansion bus to connect a keyboard and LCD.
- Support for 4 standard pololu compatible stepper motor drivers.
RepRap Wiki page with detailed information:
http://www.reprap.org/wiki/SAV_MKI
Indiegogo campaign:
http://www.indiegogo.com/projects/sav-mki-3d-printer-electronics
Technical specifications:
Processor
Atmel AT90USB1286 Microcontroller @16 MHz
Native USB interface
Flash: 128KB
RAM: 16KB
EEPROM: 128KB
Supply: 4.2V to 5.5V
Voltage input: 12V-15V
Internal regulated voltage: 5V and 3.3V
Logic supplied by on-board voltage regulator through Vin Logic can also be supplied through USB (internal source selection).
Connectivity
Edge connectors enabling right-angle connections
2 x 15A switching connectors with high power N-MOSFETs.
1 x switching N-MOSFET for low power fan.
1 x on-board uSD connector
Bluetooth interface output levels adjusted for 3.3V logic (connected to UART1 - Rx and Tx).
4 x Endstop connectors supplied @ 5V. Includes X, Y, Z and E
2 x Thermistors
14 Extra pins available for expansion and development, with the following capabilities
UART1 (RX and TX)
I2C (SDA and SCL)
SPI (MOSI, MISO, SCK)
PWM pin (1)
Analog I/O (6)
JTAG (uses some of the ADC pins)
Dimensions: 100mm x 65mm
All preassembled SAV-MkI come pre-loaded with a bootloader and Marlin firmware. You may also upgrade the firmware, modify calibration data for use with another style of RepRap, or perhaps assemble your own board.
Highlights
Marlin (pre-loaded) - Marlin's main branch already supports the SAV-MkI (MOTHERBOARD==83)
you can also get a pre-configured version of Marlin for the SAV MkI.
Bootloader: LUFA's CDC Bootloader
SDK: Arduino IDE with Teensy add-on.
Windows users only, will need to install USB Serial device (will be downloaded with the Teensy environment).
To use a SAV MkI, you will need to load appropriate USB drivers, you can get them from:
Windows-only: USB Serial Device (PRJC.com)
Compatible Firmware
Marlin Marlin: Official support, use (MOTHERBOARD==83)
Repetier List_of_Firmware#Repetier-Firmware: No support yet.
(Other firmwares are currently untested but any firmware for an arduino mega should work with proper pin setup).

↧