Quantcast
Channel: DIY 3D Printing

How to make servo powered 3d printed valves for air or fluid flow control

$
0
0
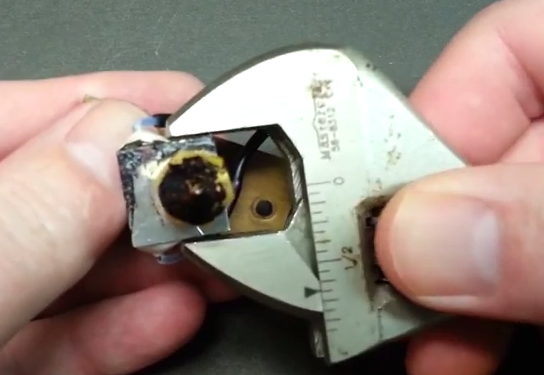
Mikey77 known for several projects like the conductive printed electronic circuits posted his new work on 3d printable servo powered valves.  The PLA printed valve can be used to menage air or fluid flow for any purpose you need it, the electronics are easy to put together and are controlled by Arduino or Picaxe. Servos used in this project are Futaba S3110 micro-servos.

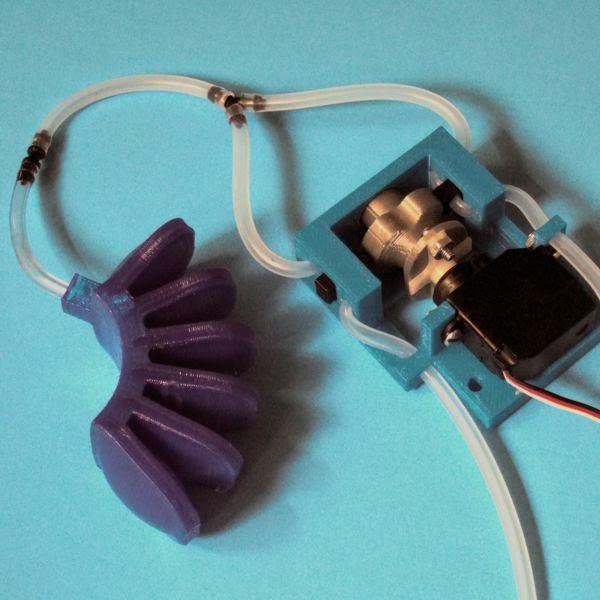
Here is the 3d printed valve controlling the 3d printed robot muscle with air pressure 


From project description:
The 3D printed valve is actually two valves that are controlled by one micro servo. When the cam (gray) is rotated to center, both valves are closed. From there, either one can be turned on, one at a time. The cam followers (black) push on the silicone tubing to compress it and create simple pinch valves.
The servo is quite efficient in that it is about the same volume of two 12 volt solenoid valves that handle the same pressure. It works efficiently at 20 PSI of air pressure and it has been tested at up to 30 PSI. It has also been motion tested and after more than 4300 on-off cycles it did not show significant signs of wear on the moving parts.
It is also considerably lighter than two solenoid valves and uses much less energy to operate. Once actuated, the valves can be left open or closed without using power.

Detailed construction guide, electronic schematics and files can be found at:

http://www.instructables.com/id/3D-Print-Make-Servo-Controlled-Valves/?ALLSTEPS


Desert 3d printing in Morroco with WASP clay Delta

$
0
0


WASP from Italy is making some big Deltas that 3d print in clay mixtures. Here is a video of them in deserts of Morroco exploring some traditional earth construction buildings and clay mixtures. They make a traditional construction mix from local materials and use it in their machine to make some pottery or construction elements. In the future they will probably enlarge their Delta and 3d print entire homes.

I live in a house that is almost 100 years old and it's made from clay / earth sun dried bricks mixed with hay. Walls are almost one meter thick and it is very well insulated. I would like more application of old techniques in the future. Concrete boxes are just boring and sterile.


How to setup ORD Solutions MH3000 liquid cooled 3d printer

Ben Heck answers 3d printing questions and shows us some tips and tricks

$
0
0


Interesting video from Ben Heck with useful information for both beginners and experienced users. 20 minutes worth watching.

From video description:
Ben responds to viewer’s questions about 3-D printing by delivering a full tutorial! He covers the kinds of printers available as well as the basic parts and costs of building your own printer.
Ben also demonstrates how to find existing designs to print and gives examples of software for designing objects from scratch. After printing some objects, he shares tips and tricks on how to create the best prints possible.

Ben Heck is known for many of his 3d printing projects. There are two I find the most interesting:

How to build portable box 3d printer:

http://diy3dprinting.blogspot.com/2012/08/how-to-build-portable-3d-printer-in.html

and his double-decker 3d printer:

http://diy3dprinting.blogspot.com/2012/12/double-decker-3d-printer-by-ben-heck.html


3D Printshow London 2014 video compilation

How to make printable 3d models from complex datasets of water and sewage systems

$
0
0
Scott Kildall has several projects involving complex data sets processing and transforming them into 3d printable objects for information visualization.
He made and interesting tutorial on how to make 3d printable data crystals and now he published two tutorials on how to make 3d printable models that are three dimensional maps made from geospatial data of complex sewer and water city systems.
How to guides are treasure if you are into 3d visualization of complex data sets and map making.


Here are links to Instructables tutorials with detailed workflow ans software used. The entire process is not too complex and can be done even if you are novice:

San Francisco sewers:

http://www.instructables.com/id/3D-Printing-the-San-Francisco-Sewers/?ALLSTEPS

San Francisco water system:

http://www.instructables.com/id/Water-Works-3D-prints-of-the-San-Francisco-Water-S/?ALLSTEPS


BTW: do remember that the map is NOT the territory ;-)

Make your own 3d printed DIY chorded keyboard

$
0
0
Chorded keyboard is a computer keyboard where you get characters by pressing several keys at the same time.
This input method should improve speed, make your keyboard one hand usable, smaller and mobile or just make you look like ultra cool elite hax0r.

There are many different projects and now there is a Chordy KEY project with 3d printable case.


Chordy KEY combinations. Well, there is a learning curve if you want to be cool ...


Project homepage on hackadayio :

https://hackaday.io/project/2115

GitHub repostiory with all the details and STL files:

https://github.com/Madfellows/Arduino/tree/master/Chording%20keyboard

From project description:
Chording keyboards have been around for a while, but appear to not be taken seriously. Although you can see many data entry methods throughout science fiction but usually involve hundreds of buttons that require the user to look at them and appear to be hard to work in adverse conditions or with bulk such as gloves.
The chording keyboard can take on many different shapes and easily used with one hand. The keys can be easily acquired without the use of pips and build with proper spacing to be used with gloves. The lower amount of keys used makes the manufacturing of the device cheaper and simpler.
This project is a completed left hand proof of concept chording keyboard that currently has all functionality of a standard keyboard minus function keys and plenty of combinations to add them and many macros. The base microcontroller is a ATmega32U4 packaged as a sparkfun pro micro, 8 buttons and 6 indicating leds the case is 3d printed and backed with craft foam.

For standard 3d printed keyboard look at:

http://diy3dprinting.blogspot.com/2015/03/photo-log-of-3d-printing-fully.html

New chorded keyboard project:

http://diy3dprinting.blogspot.com/2015/12/3d-printable-chording-handheld-keyboard.html


How to make a solar water desalination and purification still from a plastic bottle and 3d printed ring container

$
0
0


CreatorLes made this interesting project which uses waste plastic bottles and simple 3d printed part to make a solar still that can be used as an cheap water desalinator or purifier. The water inside bottle evaporates in sun and looses salt or microorganisms and is made good for human consumption.
His idea is to use it in emergencies or developing countries without adequate access to clean water.

I would like to see further testing in realistic conditions and also the economics calculations of large(r) scale deployment. How much water can it clean or desalinate under which conditions? I messaged Les and his estimate is that it will take about dozen bottles for one person per day.

Used plastic bottles can be found even on remote uninhabited islands and DIY 3d printers are also emerging in the poorest of countries made from electronic waste.

Good project Les!

He also presents a method of ppurifyingwater without need for 3d printed parts and three (glass?) containers:


All the files and instructions can be found at:

http://www.thingiverse.com/thing:464463


In addition here you can see a simple solar still made from a plastic bottle and an aluminum can you can make without any machining and purify water. The video is made by Thomas Kim.


This is not a first project for water purification on small scale that uses 3d printing.

The first project that I know of is WaterMaker by Cem Schnitzler, which uses more complex and larger cone structure and industrial grade 3d printers and high tech materials.

The STL for Water Maker files can be found at:
https://www.dropbox.com/s/ktoi0ccu25l8jjf/WaterMaker.zip

It works like this:


Here is a different still, the WaterCone that uses similar principles but it is made with traditional production methods:


How to cast pewter metal objects in 3d printed molds

DIY 3d printed tray for professional pick and place machine

$
0
0


Parker Dillmann needed a custom tray for electronic components to be served to his DP2006-2 Madell pick and place machine, so he designed them and 3d printed them on MakerGear M2 in PLA.
The tray works under realistic conditions.

Static electricity could be a problem on such PLA plastic tray, so solution would be to paint it with some antistatic coating or use different material. Maybe some type of conductive ABS treated with acetone smoothing to reduce fine electronic parts getting caught in the layers.

Similar trays could be probably adapted for different types of pick and place machines and probably all types of electronic components. This would be great opportunity for companies in the field to cut the cost or deliver 3d tray models with their machines or components.

Project homepage with stl files:

http://longhornengineer.com/2014/06/11/3d-printed-part-tray-for-a-pick-and-place/


First FDM 3d printed graphene battery

$
0
0


Graphene 3D Lab Inc. from New York presented first FDM printed graphene based battery.

I couldn't find much additional information about energy output and capacity, but it looks scalable and something that could be reproduced and refined ...

Small step forward to new energy frontiers ...


3d printable TALK device enables disabled to communicate with breath

$
0
0


Robo (aka. Arsh Shah Dilbagi IRL) has developed this 3d printable communication device for severely disabled that uses persons breath for input. The device is cheap to make at some 72 USD for the working prototype.
Great project!

Project summary:
People suffering from Developmental-Disabilities like LIS, ALS etc. are almost entirely paralysed and this disables them to communicate in any way except using an AAC device. Estimates show that approximately 1.4% of world population suffer from such disorders which is more than the entire population of Germany. The Life Expectancy of such people is estimated at 20 yrs below average, mainly because of lack of expression. Current AAC Devices cost thousands of dollars and are slow, bulky and not generic. I decided to find a better solution - An AAC device which is affordable, faster, portable and generic.
Talk expects a person to be able to give two distinguishable exhales (by varying intensity/time) for converting into electrical signals using MEMS Microphone. The signals are processed by a microprocessor and labeled as 'Dots' - for short exhales and 'Dashes' - for longer exhales. These are further interpreted as Morse Code, converted to words/sentences and sent to another microprocessor for synthesising. Talk features two modes - one to communicate in English and other to give specific commands/phrases, and 9 different voices.
Talk has made two major breakthroughs by increasing speaking rate and becoming the world's most affordable AAC device. I got predicted results by testing the device with a person suffering from SEM and Parkinson's Disease. In future I would like to add auto-predictions to my Computing-Engine and integrate Talk with modern technology like Google Glass to make the world a better place to live people with Developmental-Disabilities.
Project homepage with much more details:

http://goo.gl/99OKZn

I'm still not sure if the project was made available to public and open sourced, but it should be relatively easy to replicate ...


Photo credit: Components of Talk’s final design / Arsh Shah Dilbagi’s Google Science Fair project


3D printed transformable all-terrain robotic wheel

$
0
0
Carter Hurd is robotics enthusiast who developed this transformable 3d printed wheel that can go across different terrains and surface textures. It has a smooth side and transforms into spiked configuration when it needs more traction and grip.
Hopefully Carter will open source the design ...

Update: Carter replied to me that he will publish the design files and paper on the wheel soon on his homepage ... Thnx Carter!


Here is a video of earlier prototype:


Project homepage with many more cool robotics projects:

http://www.botsfromscratch.com


Update (28.2.2015.):

The wheel is updated, the new transformative design makes it even more capable of trversing various obstacles.


Using home microwave for lost PLA 3d printed aluminum parts

$
0
0
Lost PLA is method used to produce cement molds for metal casting and it is used mostly with molten aluminum. Desired object is 3d printed in PLA, cast is made around it and the PLA is melted away. The mold is then used for metal casting. Entire process is usually done with a propane gas powered kiln or smelter, and this project used home microwave oven.

The process is simple but you will need to take safety seriously. Object 3d printed in PLA is coated with susceptor that transforms microwaves into heat. Susceptor is made from mixture of silicon carbide, sugar, water, and alcohol. The part is then placed in a mold made of plaster of paris with perlite and heated in an unmodified household microwave to burn out the PLA.
A second microwave with a top emitter is used to melt aluminum, which is then poured into the prepared mold. When the metal cools down, the mold is broken to take out the metal part for post-processing


From project description:
Our system uses consumer microwave units to perform burn-out of PLA from molds, and a second microwave to liquify aluminium, to be poured into the mold. 3d printer inspired mechanics will move the aluminium from the microwave, into the target mold under human control across the network, so that there is no risk to the person operating the machine.
What is working and what we're working towards:
What works now is that we are able to successfully melt aluminum inside a microwave and supply our molds to get fine quality crafted aluminium parts.
The vision is to automate the process and build machines so that the system can be remotely run by a human being safely from their terminal.
Automation will be as simple as two to three machines powered by arduino with minimum axes.

One machine will be a forklift to pickup the item and deposit it safely onto a pair of fire bricks. One is a crane to pickup the top from the kiln, and one is a combination of forklift and a x,y table. This will pickup the cup, place over target, and pour through a heated steel funnel into the mold.
Ideally, we see an operator walking to the machine, starting the microwave on the mold & aluminium. When notified the machine is done, the operator can use gloves to pickup and bury the mold in sand, then walk back to their workstation, and pour the aluminum remotely. This will reduce the risk of injury to an operator to near 0, and not require any dangerous gasses to perform the melt.
All of the software will be released under the GNU GPL V3 as the project advances, with the hardware designs released under the TAPR OHL.

Detailed project page and build log on hackaday.io:

http://hackaday.io/project/2434-microwave-aluminium-printing

Project homepage:

http://fosscar.faikvm.com/trac/wiki/LostPLA


UPDATE:

Here is very detailed video presentation by Julia Longtin on Chaos Computer Club 31th Chaos Communication Congress. It is a great how-to guide on casting high quality 6040 aluminum pieces using a 3D printer and commercially available consumer microwaves


Here is a more detailed guide on how to make and use microwave oven DIY smelter for silver or tin solder:

http://www.instructables.com/id/microwave-smelter/?ALLSTEPS


Here is a different approach to melting aluminum in a microwave oven:


ProtoCycler filament extruder that uses pellets and has integrated recycling grinder

$
0
0
ProtoCycler is new filament extruder with integrated recycling grinder that can also make filament from pellets. It should enable you to produce cheap filament from scrap objects for 0$ since it has integrated grinder or from pellets for some 5$ per one kilogram. On other important feature is integrated spooling winder mechanism. It is developed by ReDeTec from Canada.

ProtoCycler description from the IndieGogo page:
ProtoCycler is a new product that allows you to recycle waste plastic into valuable 3D printer filament - safely, quickly, and easily! It comes complete with a built in grinder, intelligent computer control, safety certification, and real time diameter feedback, so anyone can make their own filament hassle free. It also saves you a *TON* of money! Even the cheapest spools are around $30 to buy new, and they can certainly cost much more than that. ProtoCycler lets you make the same 1 kilogram spools for just $5...and if you recycle, your spools are FREE!
This means that ProtoCycler will pay for itself in just 10-20 spools - and as anyone who 3D prints knows, this doesn't take all that long. Never mind all the waste you'll divert from the trash bin. Simply put, if you 3D print, you need ProtoCycler!
ProtoCycler technical specifications:
  • Diameter tolerance: +/- 0.02mm
  • Extrusion speed: Up to 10 ft/minute
  • Electrical usage: 60 W Average
  • Dimensions: 14" x 12" x 10"
  • Grinder input: 5" x 5"
  • Hopper Capacity: Expandable
  • Max Temp: All metal hot end for 400+ C
  • Price: 799 USD range
ProtoCyler features:
  • First consumer extruder with UL certification
  • First extruder with grinder for built in recycling
  • First extruder with diameter feedback and computer control
  • Distributed Spooling
  • Automatic start up and shut down
  • Full Manual mode for hacking
  • Open source software and community
  • Beautiful brushed aluminium enclosure
  • Patent pending MixFlow extrusion technology


Comparison of ProtoCycler to other filament extruders, bot DIY and prosumer models  


ProtoCycler video presentation:


Indigogo campaign:

https://www.indiegogo.com/projects/protocycler-free-sustainable-3d-printer-filament

Company page: http://www.redetec.com/


BetAbram construction 3d printers from Slovenia

$
0
0
Slovenia is our little neighboring country to the west and they have several 3d printing projects like: KORUZA laser wifi, PrintGreen and TroubleMaker 3d printer. Now they have a bigger  machine in the game that can print large concrete structures or buildings with BetAbram series of large 3d printers.
The machines are moving on a rail system and feature metal gantry with extruder that deposits concrete / cement mixture layers.

BetAbram has three different sized printers: P1, P2 and P3. Z-axis height is theoretically unlimited since it can be extended with a rails systems to print tall buildings. 
In the X and Y axes, the P3 can 3d print buildings with plate surface of 4 meters x 3 meters (12 square meters), the P2 is capable of 12 meters x 6 meters (72 square meters), and the biggest, P1 is capable of 16 meters x 9 meters (144 square meters).

Prices will probably range starting from 15000 euro up to 30000 euro. 


Here is a video of BetAbram machine in action:


BetAbram company page: http://betabram.com/index.html


Swarmscapers 3d printable robots that create structures with sawdust and binding agent

$
0
0
Swarmscapers are 3d printable robotic project that works on development of swarm robots that can work in hostile enviroments and create structures. At this stage of project the robots work on sawdust which they shape by deposing a binding agent.  In future similar machines will hel us inhabit the space.

Swarmscapers are two months long research project conducted in the Creative Architecture Machines studio, taught by Jason Kelly Johnson and Michael Shiloh at California College of the Arts in the Digital Craft Lab. It is a collaboration between Clayton Muhleman, Alan Cation, and Adithi Satish.

Description of the project from the Instructables page:
Swarmscapers explores the potential of an autonomous swarm of robots capable of operating independently in hostile environments. Utilizing on-site materials to create inhabitable structures, the robotic swarm's behavior materializes through a slow and constant process of layered 3d-printing.
This projects the architectural potential of emerging robotic and fabrication technologies through a bottom-up rule-based system. Each unit within the robotic swarm acts as an individual agent embedded with a specific rule-set that drives its behavior and allows it to coordinate with other agents in the system. These agents 3d print large, architectural structures that calcify and emerge from the landscape where the impetus for structure is to develop future encampments in extreme environments, places where humans could not otherwise build. Extreme heat and the abundance of raw materials in the desert make it an ideal testing bed for the robotic swarm to operate, creating emergent seed buildings for future habitations that are ready for human occupancy over the course of multiple decades.

In order to test this wider vision, we established a laboratory-like setting focused on using at least one mobile robot to 3d print scaled objects within a 48" x 48" x 20" build volume. There were 2 major constants within our larger concept that allowed us to focus our research and achieve our goal in a 2 month time frame, which were to create a gantry-less mobile powder bed and inkjet head 3d printer(the specific technology of a Z Corp 3d printer), and to utilize on-site granular materials as building materials. It was important for our machine to remain gantry-less and mobile because it implies that multiple machines will one day be able to autonomously 3d print entire buildings, and it implies that these printers are relatively small compared to the buildings they are 3d printing. The advantages to using powder bed and inkjet head 3d printing as a technology, is that it allows us to print without scaffolding and create highly intricate shapes, and it allows us to reuse the leftover materials so that there is a minimal amount of waste during construction.
In addition, our method can work with almost any granular material including sand, rice, semolina, salt, and sawdust. Since it is important to use materials found on site, we conducted our larger 3d prints in sawdust because CCA generates 6 dumpsters full of sawdust per week. Sawdust is abundant and it is extremely lightweight, making it an ideal material for us to test. The robot works by driving on top of the sawdust based on a tool-path defined in the computer, and dropping a binding agent on the material, hardening it in place. It does this repeatedly, layer by layer until the object is complete.

Swarmscaper robot in its natural inhabitat making a nest for the offspring ...

Anatomy of a Swarmscaper robots and three types: spreader, fixer and excavator ...


To learn more and get all the files needed to make robots yourself go to:

http://www.instructables.com/id/Swarmscapers-Autonomous-Mobile-3D-Printing-Robots/?ALLSTEPS


Here is a video of Swarmscapers in action:


For a similar project of small robots making larger structures take a look at Minibuilders.

RepRap Universal Plastic Pellet Extruder project

$
0
0


Here is a new extruder developed by Richard Horne that can print directly from pellets. It is much cheaper to print from pellets then to buy filament. One could also grind disposed or failed prints and recycle them directly.

There are several well developed projects for DIY filament extruders but their main purpose is to produce filament and not directly print from it.
There are also new machines like Sculptify David that print from pellets but nothing open sourced and adapted for variety of small home 3d printers.

This is project under development and Richard is asking for feeedback, so go and drop a comment on his video:

https://www.youtube.com/watch?v=nW4kmJAypZM

Excellent development! Kudos Richard!


Update:

Richard released his extruder and details about it can be found on his blog:

http://richrap.blogspot.co.uk/2014/12/no-more-filament-quest-for-universal.html

Here is detailed video presentation of the pellet extruder by Richard:


All the files to make the extruder can be found at:

https://www.youmagine.com/designs/universal-pellet-extruder-reprap-3d-printing


DIY extruder for HDPE aquaponic plant growing strips

$
0
0


Extruders can be used for more than just filament extrusion. Here is a project from Web4Deb that makes growing media HDPE strips for plants in aquaponic or hydroponic systems from raw pellets. Auger based extruder is powered by windshield wiper motor and geared with bicycle gears. You could alos use it for HDPE recycling. Food from plastics ...

Extruder specs:
  • The barrel is heated with a length of Nichrome wire and and insulated with what appears to be polyimide tape.
  • The auger is a standard 3/4" wood auger bit (bought a set from Harbor Freight) and cut it down to length.
  • The auger is driven by a wind shield wiper motor which is geared down with a bicycle chain and sprocket.
  • The heating element draws around 16A at 12V (192W) from a computer power supply.
  • The temperature for the extruder barrel is controlled with a Teensy AVR micro-controller.
  • The die appears to be interchangeable.
  • The extruded HDPE is forced through a set of fan cooled rollers.
  • Two individual temperature sensors are located on the extrusion barrel.
  • The Teensy AVR micro-controller appears to be used to switch one or more relays through a transistor array.

RepRap wiki page: http://reprap.org/wiki/Web4Deb_extruder


Plant growing on extruded HDPE strips. It is the miracle of science :-)  

Web4Debs extruder


3d printing can be used in wide variety of aquaponic and hydroponic systems:

http://diy3dprinting.blogspot.com/2014/08/make-low-cost-diy-hydroponics-system.html

http://diy3dprinting.blogspot.com/2014/08/small-diy-aquaponic-system-producing.html

Happy growing!

Developing a DIY metal detector with 3d printed parts

$
0
0
If you want to detect metal underground and you have a 3d printer, Arduino, some wire and PVC pipes, you can start to build this DIY contraption.

There are links to several how-to guides in this post based both on Arduino and Intel Galileo controller. You can use 3d printed and parts cut from plywood.

All the files needed for the detector coil and other parts: http://www.thingiverse.com/thing:416163

Here is the projects homepage: https://solar1.net/drupal/metal_detector

He uses this metal detector project as the basis: http://dzlsevilgeniuslair.blogspot.dk/2013/07/diy-arduino-based-metal-detector.html


3d printed metal detector coil


Owning a metal detector is not prohibited in my country (Croatia) but using it to find anything of historical values could be heavily punished. I'll need to think if I will make this detector. Maybe in the future.

Update:

I found another 3d printed DIY metal detector project developed by Paulo Bubolz from Brazil. It is controlled by Raspberry Pi. Files for it are not released yet ...


Update 2:

Here is a plywood frame and Intel Galileo based DIY metal detector with LED strip indicator. Very detailed guide is available at:

http://www.instructables.com/id/Metal-Detector-2/


Small DIY aquaponic system producing food on small aquarium with 3d printed modules

$
0
0
I do have a relatively large food garden at my home, but growing food is time consuming and subject to many factors such as weather and diseases. This year was terrible, we had a very small harvest but we invested a LOT of work. This made me more interested in aqaponics and hydroponics.

I wrote about 3d printed aquaponics before but I researched more and found this small system.
It grows plants as part of small fish aquarium (10 gallon=37 liters) in 3d printed modules.


It loos good enough to start experimenting with spices, herbs and salads. Maybe also as a seed starter.

All the parts are here:

http://www.thingiverse.com/thing:163468

If you really want a small DIY aquaponics system that fits anywhere you can try with this one from Cascaqua that will enable you to grow some salad or spice herbs and features an organic moder design:


Cascaqua homepage with files:

http://avooq.com/product/cascaqua/


UPDATE:

3DPonics system: http://diy3dprinting.blogspot.com/2014/08/make-low-cost-diy-hydroponics-system.html

if you want to make your own growing strips for aquaponics, check this DY extruder:

http://diy3dprinting.blogspot.com/2014/08/diy-extruder-for-hdpe-aquaponic-plant.html


Printing with magnetic fields to get advanced magnetic objects with Correlated Magnetics MagPrinters

$
0
0
Correlated Magnetics makes printers that print with magnetic fields on metal surfaces to get some advanced magnetic properties and enable them to make magnetic cinematic machines. 


MagPrinter technical description:
Correlated Magnetics Research has developed an integrated magnetizing system to support development and manufacture of coded multipole magnetic structures – Polymagnets® – from any magnetizable material.The system features a computer-controlled platform that moves a platform tray relative to a specialized ‘printhead’ that produces a focused high intensity magnetizing field that creates a single, well-defined, remnant magnetic source element (maxel) at a prescribed location.

The system is capable of producing hundreds of such maxels per minute, and enables the creation of patterned mulitpole magnetic structures that function as no ordinary magnet can. The MagPrinter is designed to print maxels on the surface of any permanent magnet material from rare-earth based materials to ceramics, and even flexible materials.
The fifth-generation MagPrinter incorporates a modular ‘pulser’ subsystem. Multiple pulsers can operate in parallel to support large scale mass-production demand.
The MagPrinter features an advanced user-environment with automated geometry placement functions, a robust editing toolset, and a storage and retrieval library to allow rapid design, modification, physical prototyping, and cataloging of coded magnet structures.
The MagPrinter runs on standard 110V AC power and includes laptop controller, standard print-tray platforms, and libraries of engineered Polymagnet patterns to produce stronger attach forces, controlled field emission and field reach, and multiple examples of advanced functionality for attach-release, attach-repel, alignment, contactless attachment (hover), and switchable force systems.
From Polymagnet concept to completion, the MagPrinter system provides all the tools necessary for rapid magnet prototyping and manufacture.

Here is a smaller Mini MagPrinter version and some more details about the technology:


Mini MagPrinter description:
The Mini MagPrinter® is built for product design professionals to integrate advanced magnet functions into new consumer and industrial products. The Mini MagPrinter system includes CMR’s Polymagnet Catalog® of pre-engineered magnetic functions, and the design software to customize magnet behavior or design Polymagnet functionality from scratch.

The Mini MagPrinter is a desktop rapid-prototyping magnetization system that ‘prints’ arrays of magnetic regions onto a single piece of magnetic material to produce a Polymagnet – a patterned magnet tailored to a specific behavior, strength, and field distribution. Each Polymagnet is a system of smaller magnets (maxels) of mixed polarity in patterns that are imprinted by the Mini MagPrinter. A conventional magnet can be transformed into a Polymagnet by placing the magnet into the Mini MagPrinter, choosing a pattern from the Polymagnet Catalog, and re-programming the magnet to perform new functions not possible with conventional magnetization. The Mini MagPrinter produces Polymagnets on the strongest neodymium magnets, flexible materials, ferrites and specialized materials such as samarium cobalt.

There are many examples of magnetic mechanisms you can make:


More objects and videos are at: https://www.youtube.com/user/correlatedmagnetics1/videos


Mini MagPrinter page:

http://www.correlatedmagnetics.com/minimagprinter/

MagPrinter page:

http://www.correlatedmagnetics.com/magprinter-product/


How to clean and remove partial nozzle clogging

$
0
0


You may even not know that your nozzle is partially clogged. Eric William made this excellent tutorial on how to fix partially clogged nozzle and improve 3d print quality.You will need acetone and some tools. But it looks simple to do.

Thank you Eric!

Source: https://www.youtube.com/watch?v=SfACwC9diQY


Update (27.9.2014.):

Here is another video tutorial and method for unclogging the nozzle without disassembly with detailed description at:

http://bukobot.com/nozzle-cleaning


Wearable Arduino based display on 3d printed glasses frame made by 13 year old

$
0
0


13 year old Clay Haight made this sub-100$ dollar simple wearable eye display. There are many other DIY Google Glass projects that involve 3d printing, but non with such a young maker.

From the source:
Clay’s DIY “Google Glass” uses the sensors on the Arduino Esplora along with the Arduino LCD screen and a 3D printed frame.
He can use voice commands to bring up a calendar with his schedule, local maps, and temperature and weather info.
A headband on the back keeps it from tilting to one side.
“Now they are extremely comfortable,” says Clay. “In fact I wear them around my house and tell my parents the temperature just for fun!”


Source and more info: http://makezine.com/2014/07/16/diy-google-glass/

Update:

Here is a similar project: http://diy3dprinting.blogspot.com/2014/07/3d-printable-low-cost-foldable.html

How to 3d print a brushless DC motor

$
0
0


Patrick Eells designed and printed fully functional brushless DC motor. You can use any FDM DIY 3d printer, but you will need magnets and wind some copper wire coils.
The motor was designed as a 3-phase, 4-pole brushless DC motor with 4 - N52 neodymium magnets on the rotor, and 3 wire wrapped solenoids connected to the stator. The motor is controlled by Arduino. The total cost to build this motor without the Arduino micro controller and the batteries was 27,71 USD.

Excellent project!

Very detailed guide can be found here:

http://www.instructables.com/id/3D-Printed-DC-Motor/?ALLSTEPS

All the files and guide in PDF format can be downloaded here: http://pitt.edu/~pfe3/3DPrintedMotor.zip


There was a stepper motor printed in the past, but it was printed on commercial grade printer:

http://diy3dprinting.blogspot.com/2013/11/working-3d-printed-diy-programmable.html


Latest Images